Monday, March 11, 2013

Making Bentwood Halibut Hooks


My friend Benjamin Greené and I recently made some traditional bent-wood halibut hooks to give away as thank-you gifts to the many Haida people that assisted in his documentary film about indigenous foods called Survival Prayer. The process of making these hooks helped me appreciate both the complexity of traditional Haida fishing techniques as well as the functional beauty of the hooks themselves.

Pacific Halibut (Hippoglossus stenolepis) are among the largest fish native to the Pacific Northwest, reaching 8 feet in length and weighing as much as 500 pounds. Such colossal beasts require specialized fishing equipment, and the tackle used by Indigenous fishermen in the Pacific Northwest was a sort of hybrid between that used for whaling with a harpoon and fishing with a hook and line. Like Captain Ahab’s crew, Indigenous Halibut fishermen fastened their fishing lines to buoys that provided constant flotational resistance to the panic stricken leviathans. This system both allowed the fisherman to avoided potentially dangerous contact with the Halibut until it was thoroughly played out and protected the fishing gear from breaking-force strains. Further shock absorbance was provided by the fishing lines, which were braided from the elastic stalks of Bull Kelp (Nereocystis luetkeana). Nancy Turner’s book Plants of Haida Gwaii describes the elaborate process of making fishing line from Bull Kelp.

Hilary Stewart's Halibut fishing illustration
The manner in which the hooks were tied to the business end of the fishing line was very particular to halibut fishing. An anchor stone was tied to the very end of the fishing line, sometimes with a slip knot that was shaken loose when a halibut was caught. A “spreader” made from the wood of two Sitka Spruce (Picea sitchensis) branches was fastened a few feet above the anchor stone. The bases of each branch were lashed together forming a bow shape, and the junction point was securely tied to the fishing line. To both ends of the spreader, halibut hooks were secured on short “leaders,” that suspended the hooks a foot or two from the sea floor (See page 39 of Hilary Stewart’s Indian Fishing for a detailed illustration of this system). The flexibility of the Spruce spreaders further increased the shock absorbency of the entire fishing rig.

There are various styles of traditional halibut hooks, but the ones that I think are the most elegant are made from Yew (Taxus brevifolia) wood that is bent into a “C” shape. I had some scraps of Yew left over from a digging stick project, and milled them into ½ inch thick square staves that were about 20 inches long, taking care to cut along the grain lines. I soaked these for several days, and then made plans to meet with Benjamin to bend the staves into the proper hook shape.

Yew wood is very dense, tough, and stiff. It is prized for bow making wherever it is found, and was also used by Native Americans in the Pacific Northwest for clubs, splitting wedges, and tool handles. Bending such a stout wood requires steam. Traditionally, yew wood staves were steamed inside of kelp stalks that were heated on hot rocks. Benjamin and I modernized the process with a steam kettle and plastic bag. We placed the wood inside a long tubular plastic bread bag, and secured the open end of the bag to the mouth of the tea kettle. You might think that the steam would melt the plastic, but it doesn’t (although if you are using a gas stove, be careful not to melt the plastic on the flame!). After 45-60 minutes of steaming, the wood was nice and flexible, and we quickly bent it around some molds that I had prepared.

The result wasn’t always too pretty at first, since many of the bending fibers frayed out, but for the most part, the frays were small enough to sand or carve off. We tempered the wood by baking it in the oven at about 300 degrees for 20 minutes. Heat treating is really important because it drives off the moisture that makes the wood pliable. Traditionally, the tempered hooks were then sealed with mountain goat tallow to prevent the seawater from re-softening the wood. Doubtful that our hooks were going to actually be used, we skipped this step for fear the hooks might become the subject of more fly than human admiration.
A sharpened bone barb ready to be lashed on


The barbs of these hooks are traditionally made from either wood or bone, and since I had some deer bone, I cut it into thin strips which we sharpened and lashed to hook with artificial sinew. Traditionally, spruce roots were used for the lashing.
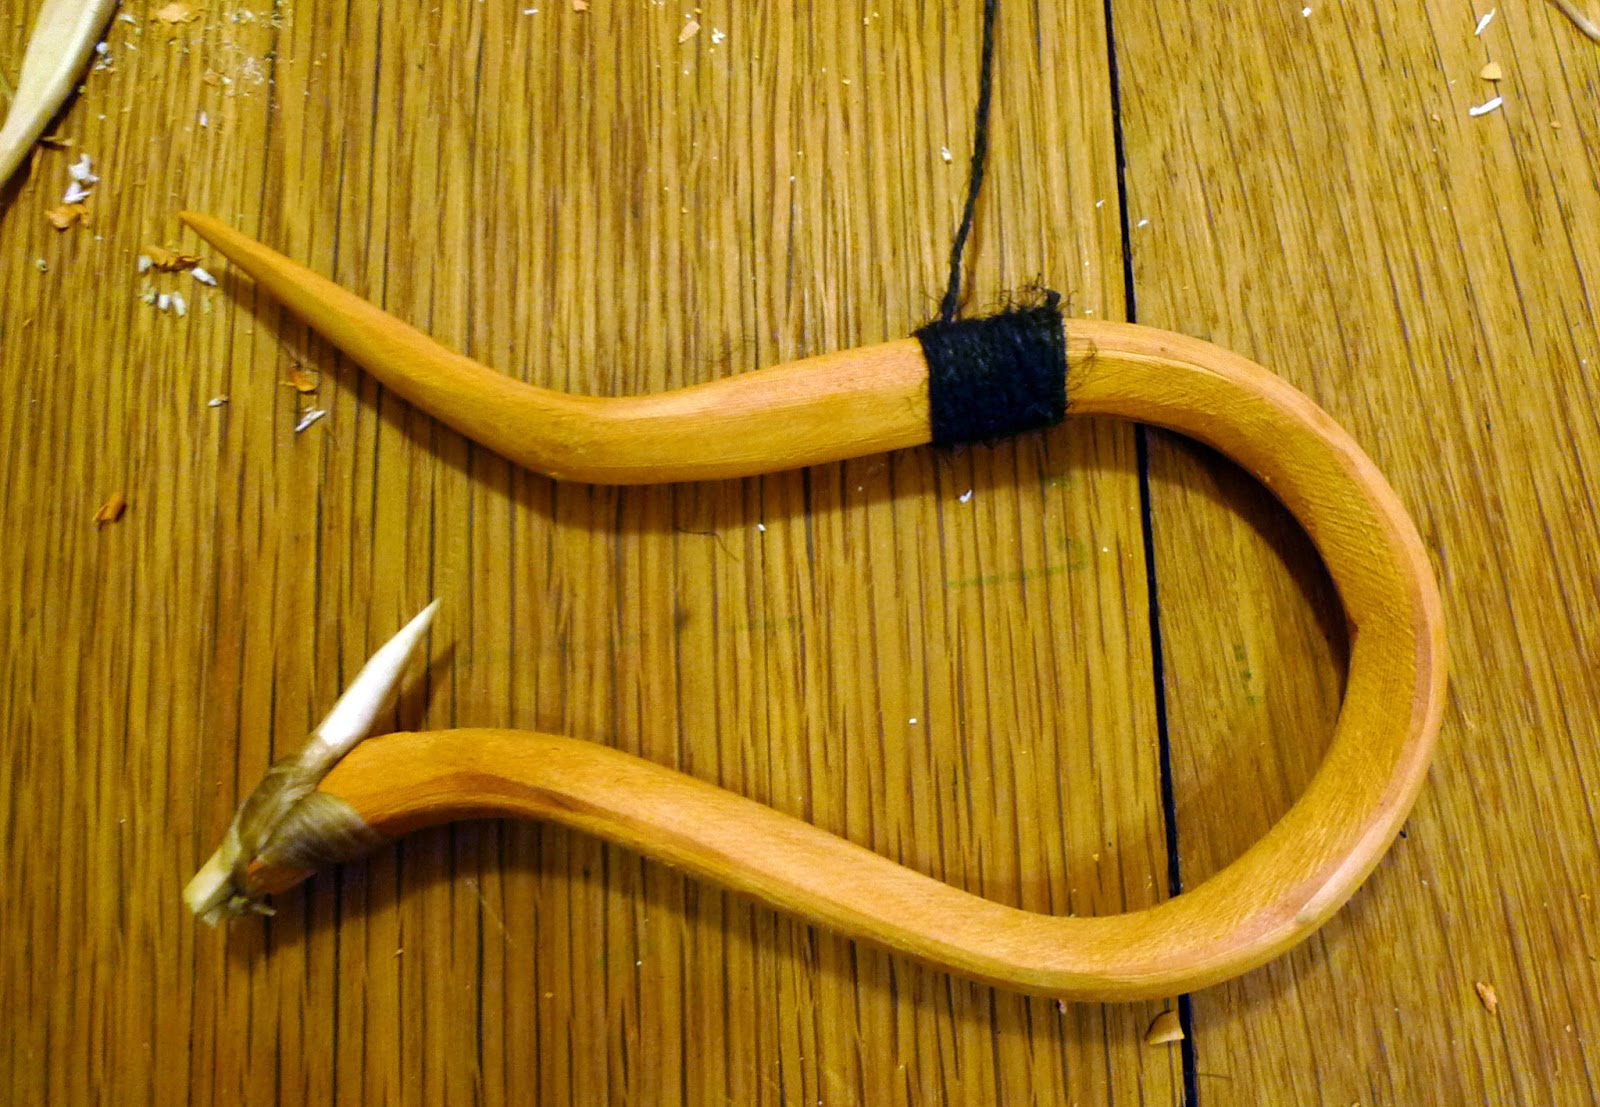

Halibut hooks are specifically engineered for halibut. My mentor, Clan Chief Kwaxsistalla told me that the gap between the end of the barb and the top of the hook should be the thickness of your thumb, because that is thickness of a good sized Halibut's lip. Fish that are too big--and likely to break the hook or line--have a lip that is too big to fit into the hook, and fish that are too small can’t get their mouth over the barb. The long curving tip of the halibut hook helps deflect the mouth of the fish to the right part of the hook and makes it impossible to snag the bottom, seaweed, or the wrong part of the fish. Modern tackle may benefit from stronger materials like steel and Dacron, but they aren’t nearly as tuned in to the nature of Halibut. I even argue that traditional gear is more sustainable because it targets moderate sized fish, sparing the large reproductive females and undersized juveniles.

Finished Halibut hooks

After a few days of work, Benjamin and I had a dozen finished halibut hooks to show for our labor.

Pin It submit to reddit

Tuesday, February 19, 2013

Eating Valley Oak Acorns


Valley Oak A-corn Bread
Spread upon a large cookie sheet, the Valley Oak (Quercus lobata) acorns that I collected last month are a constant temptation. The acorns are just so big! Even though I usually dry my acorns completely before shelling them, I wanted to share the process with some college friends that were visiting, so we shelled a pint that were not yet dry, and cooked up my first batch of Valley Oak acorn bread.

This (left) Valley Oak acorn split itself open as it sprouted
Valley Oak acorns sprout in the late fall and if given the chance, will rapidly send a tap root deep into the ground. Most of the acorns I collected last month had just started to sprout, and several of the shells were split along their entire length from the vital force of the growing nutmeat. A few acorns even escaped their shells completely! Late season harvesting has advantages since only healthy (weevil free) acorns will sprout, and expansion-fractured shells are a cinch to remove by hand. However, on low mast years, all the late season acorns might already be cached by the squirrels.

Partially dried Valley Oak acorns
Acorns that haven’t hatched themselves out of their shell can still be easily processed if the nuts are completely dry. Acorn nutmeat shrinks by up to about 10 percent as it dries, and the shells become brittle, allowing them to crack easily. If you shake an acorn that is sufficiently dry, you should be able to feel the nutmeat rattle inside of the shell. Hurried by temptation, I struggled to remove the shells from the acorns that were still fresh, but hadn’t split themselves open. Using a nutcracker was like trying to crack open a gummy bear, because both shell and nutmeat were still soft, so I finally resorted to slicing open the shells with a paring knife. The nutmeat came out of the shell free from the bitter brown seed coat, which clings to other species such as Black Oak (Quercus kelloggii).

Shelled acorns ready to blend into flour
Some species of acorns (like Garry Oak) oxidize rapidly when shelled fresh, but my Valley Oak acorns appeared to be amazingly stable. I put 2 cups of shelled acorns into a Vita-mix with 2 cups of water, and blended them into a fine flour batter. Then I poured the batter into a gallon sized mason jar and filled it with water, which I changed every day for several days (for more information about this process, see How to Eat an Acorn). After 3 days the batter was only slightly astringent, and after 5 days, it was almost completely free of all bitter/astringent constituents. Katrina used the batter to make her a-corn bread recipe, which turned out amazingly delicious- almost like a butterscotch brownie! Of all the cold-leached acorns I have tried, they are among my favorite, perhaps second only to Garry Oak acorns. Valley Oak acorns are actually less bitter than Garry Oak acorns, but also slightly less flavorful.


Pin It submit to reddit

Sunday, February 3, 2013

Bigleaf Maple Syrup


Home-made Bigleaf Maple syrup
When I was nine years old I ravenously read the Laura Ingles Wilder books and was quickly enamored by the pioneer lifestyle of the Ingles family, especially the stories about Laura’s early life in the Wisconsin woods, and Almanzo’s life in the forests of New York. One day, after reading about how Almanzo helped his father collect and boil maple sap to make maple sugar and maple syrup, I decided to try and make some of my own. We had a large wooded lot next to our house and I knew that there were several Vine Maples (Acer circinatum). The Vine maples were memorable because we used to climb up the trees until they bent down to the ground; like giant springs, the bent Vine Maple stems amplified our jumps, and launched us 10 feet or more off the ground. Without any instructions beyond Wilder’s anecdotes, I improvised my own sap collection system from an empty tin can nailed to a tree. To try and induce sap flow, I cut a small “V” in the bark above the pail. The days that followed were filled with anticipation, and ultimately disappointment, as my tap didn’t even yield a drop.

It wasn’t until I moved to Wisconsin for college, almost 10 years later, that I actually talked with someone who made maple syrup. Sugar Maple (Acer saccharum) and Red Maple (Acer rubrum) are most commonly tapped, but several other species of maple as well as birch, walnut, and hickory can also be used. I learned that my Vine Maple experiment failed because I improperly tapped the tree, at the wrong time of the year. Rather than cutting a “V” in the bark, I should have drilled a small hole 1-2 inches into the sap wood (xylem). Sap runs when the trees are leafless and the temperature swings above freezing during the day and below freezing at night. My major professor and best friend both had small sugar bush operations, but the timing never worked out for me to help them out and experience the process first hand.

When I moved to Victoria for my master’s degree, I started hearing about a festival and network of hobbyists and businesses on Vancouver Island that were focused on producing sap from our native Bigleaf Maple (Acer macrophyllum). Once again, a busy student schedule made it impossible to attend their events, but Katrina ordered a wonderful book on the subject called “Bigleaf Sugaring: Tapping the Western Maple” by two of the core members, Gary and Katherine Backlund. Here in Washington, Dr. Terry Maresca is also promoting Bigleaf Maple tapping; last summer, with school behind me, I made a point of attending her workshop at the Northwest Indian College Traditional Food Conference on Bainbridge Island.


Armed with good literature and hands-on instructions, I wasn’t about to let this winter pass without tapping a few Bigleaf Maples, so I ordered a dozen stainless steel taps, purchased some food grade plastic tubing, and started hording large empty water jugs from the neighbors' recycling.

Bigleaf Maple taps at Dad's house
In early December, I tapped a few stems on a large clustered Bigleaf Maple next to Dad’s house. Using a 5/16” drill bit, I bored 2 inch long holes at a slightly upward sloping angle into trees about 2 feet from the ground. My taps taper to an outside diameter of 5/16, so when I gently pounded them in, they fit snugly. To each tap I connected plastic tubing that allowed the sap to flow downwards to a "T" fitting, and then into a large receptacle at the base of the tree.


3 gallons of Bigleaf Maple sap
Theoretically, when the temperature and barometric pressure are adequate, sap flows up from the roots through long hollow xylem cells, to the branches and developing buds. Like a pin prick on a finger, the xylem cells, bisected by the drill, bleed sap until those living tissues heal, at which point a new hole must be drilled. Throughout December, our taps yielded only a few cups per week but during a stretch of cold nights and warm sunny days in mid January, sap production increased dramatically peaking with about 13 gallons of sap produced from 3 trees in about 3 days. According to the Backlunds, Bigleaf Maples in the Pacific Northwest can produce sap for 5 months from November until February, which is much longer than the 6 week season that is common for maples in the Northeastern woodlands.

Testing the specific gravity of Bigleaf Maple sap
The time had finally come to figure out how I was going to boil the sap down into syrup. Bigleaf Maple sap is only about 2-4% sugar with the remaining 98-96% being water. In order to produce syrup, the water must be evaporated off until the sugar concentration is about 66%. Small batches can be evaporated on a stove top, but high energy costs quickly make this method impractical.

The solution is to burn wood, which is practically free for the taking for anyone living in the Pacific Northwest that has a strong back and a little forest land. Traditionally, a large cast iron cauldron is suspended over a fire and sap is added as it is collected until the season ends and the syrup is “finished.” Open fires are notoriously inefficient and impart (for better or worse) a smoky flavor on the sap. Today, most people that make syrup use an evaporator that is made up of a steel firebox, and a stainless steel evaporating tray with a maze of chambers that allows for a continuous feed of sap in one end, and finished (or nearly finished) syrup out the other end. New to this enterprise, my evaporator is somewhere in between. I employed the same old rusty stove—salvaged from a sunken ship—that Katrina uses for making salt and simmered my sap in a 5 gallon pot placed on top of the stove.

My small sugar shack
Here in the Pacific Northwest where our winters are pretty soggy I needed to make sure that my open pot wouldn’t fill up with rainwater faster than I could evaporate it off, so Dad and I built the world’s smallest sugar shack (3’x4’) out of salvaged roofing and scrap lumber. With stove inside the sugar shack, I managed to reduce 5 gallons of sap into syrup, but it took an entire day. Commercial units boast evaporation rates an order of magnitude faster, so I set out to make some improvements.


Trying to evaporate sap on a stove
The problem with my stove is that the surface that is supposed to be conducting heat into my pan is ¼" steel, and the walls, which are supposed to be insulating the heat and forcing it upwards into my pan, are thin, rusted, and riddled with holes. A roaring fire wasn’t even sufficient to keep the sap boiling, so my sap evaporated leisurely, like a warm bath. To mitigate for the shortcomings of my stove, I replaced my large kettle with a stainless steel steam table tray (like the trays used at buffets), which has a larger surface area on the bottom, and when only filled partially with sap, managed to produce a gentle simmer. 

The improved evaporator
A nice boil
Still not satisfied, I decided it was time to modify the stove itself. My friend Ric helped me cut away a square section of the stove top with his oxy-acetylene torch to allow the steam tray table to nest inside the stove and come into direct contact with fire. The new setup is vastly superior; I can easily maintain a vigorous boil and I have increased my evaporation time three-fold.


Filtering warm sap that is ready to be finished
One of the tips that Terry shared with me was to reduce the sap to about 50% sugar in small batches as you collect it, and then store it in the freezer until you have several quarts. Terry likes to finish her syrup in larger batches, because the finishing process demands constant attention to ensure that you don’t drive off too much water and scorch the syrup. After three days reducing 4-5 gallons each day, I was eager to taste some syrup and decided I had enough condensed sap to finish.


Finishing the sap on an electric range
There are several ways to finish syrup, but as far as I can tell, the most important thing is that you have the ability to take your syrup off the heat source once the sugar concentration is 66-68%. Syrup above that concentration will crystallize into sugar, and below that, it is prone to molding. I finished my syrup in a large saucepan on our electric stove-top and monitored the sugar concentration with a thermometer. The boiling temperature of finished sap at sea level is about 219° F, and after about an hour of constant monitoring my syrup was finished. I poured it immediately into sterilized mason jars and screwed the lids on tightly.

My 13 gallons of Bigleaf Maple sap yielded about 1.75 quarts of syrup, which is a little better than a 30 to 1 ratio of syrup to sap (and means that sugar concentration in my sap was a little above 3%). While this doesn’t sound like a lot, it is on par with sap from Sugar Maples. The taste of my maple syrup is superb. Too bad it took me 24 years to figure out how to make it!
My first batch of Bigleaf Maple syrup

Pin It submit to reddit

Tuesday, January 22, 2013

Fat and Offal


 Guest Post by Stu Crawford

I've recently found myself spending a lot of time processing dead animals, and I've been learning things that I definitely should have already known.  I thought that some of you might be interested, so I took a few pictures and wrote up an article.

One of the dead animals was a deer that I shot, the other was a goat that I was given to use for an anatomy class with the elementary school in town.  So, I canned, dried, and froze a whole lot of meat.  I also had a lot of non-meat items to deal with.  Some things, like spleens, are inherently tasty and require no special attention.  Other things require a bit more knowledge and effort to transform them into a useable product.

I ended up with 20 lb of extra fat that I had to do something with - the deer was pretty fat, and the goat was obese.  And when I dissected the goat with the elementary class, we opened up its digestive track to look at all its stomachs.  This reminded me of all the tasty tripe that I can't buy in Haida Gwaii, so I decided to try processing my own.

There is a lot of information on the internet, but some things are underrepresented.  There was very little reliable information about rendering fat, and none about processing tripe.  So, I've documented my efforts.  I've been contemplating putting together a webpage for ages, and someday I might actually get around to doing it, but until then, here's my article.

FAT

There are a variety of different types of fat, which I will divide into three categories.  

The hardest fat is the stuff around the kidneys, which is called suet if it is from a cow, and leaf lard if it is from a pig.  Cow suet is rendered into tallow for making candles and soap, and used for deep frying.  Kidney fat has a higher smoke point than other animal fats, about 200°C, which is really hot.  Suet and leaf lard are often the preferred fats for a lot of baking.  The pot on the rear right burner has goat suet.

Various kinds of fat ready to be rendered: goat omentum (left), goat suet (rear right), and deer back fat (front right). S Crawford Photo

The second most preferred fat for cooking is the back fat.  I would expand this to include any subcutaneous or intramuscular fat.  This is the bacon fat, and of course it is pretty tasty.  The pot on the front right burner has deer back fat.

The other significant fat is the abdominal fat, which is sometimes called caul fat.  This fat isn't loose in the abdominal cavity, it is contained within a fatty membrane called the omentum, which drapes over the organs.  This is the least preferred fat for cooking, although some people suggest wrapping a roast in the omentum before baking it, which sounds delicious, because it's basically a giant fat blanket.  The pot on the left has the omentum fat from the goat.

In case you are wondering, that's about 80,000 calories of food cooking on the stove.  It's not every day that you can cook a month's worth of food all at once.

I rendered the fat in water, which meant that I didn't have to watch it as closely to prevent it from burning.  I added 2 cups water per lb of fat, and then let it simmer for a long time.  The pots with 3 lbs of fat in them took 5 or 6 hours, and the pot with 6 lbs of fat took 9 hours.  Eventually all the water boils off and you are left with little deep-fried pieces floating in pure fat.

Early stages. S Crawford Photo
Final stages. S Crawford Photo
The picture on the left is after it has been boiling for a few hours.  The fat chunks are starting to break down, but there's still water in the pot, so the temperature is being held at right around 100°C.  The picture on the right is after about 8 hours.  The water has all boiled off, so it looks more like a sizzling deep fryer than a boiling pot of soup, and the temperature is now starting to increase.  I had best results when I boiled it until it hit 125°C.
  
Rendered fat cooling in jars. S Crawford Photo
The yield was roughly one pint per pound of fat, but it depended on the type of fat.  The back fat had the lowest yield, probably because it had more impurities.  I ended up with a little over a gallon and a half of product.  The jars on the left are still warm and liquid, they will turn white when they cool.  The jars on the far right are the deer back fat, which ended up being slightly darker in color.
  

Ground deer suet. S Crawford Photo
I didn't render all of my fat, I also ground some of the suet for use in baking.  The bowl on the left is goat suet, the bowl on the right is deer suet.  I froze the chunks first so they could go through the meat grinder.  I baked the biscuits using the ground deer suet instead of lard.  They were delicious!  I don't know how different they would have been if I had used the rendered suet instead of the ground stuff, it's something that I'll have to test out.  I also need to compare the fats from different locations on the animal, and from different species.  Lots of eating to do. 
Suet biscuits. S Crawford Photo.

TRIPE

Towel Trip. S Crawford photo
The first stomach is the rumen, which is the picture on the left.  As you can see, it is substantially larger than all the other stomachs put together.  It is also called towel tripe, but I have never actually seen it for sale.  Apparently it doesn't taste as good as the other kinds.  The second stomach is the reticulum, which is called honeycomb tripe.  This is my favorite type of tripe.  There is a common dish at Chinese restaurants called gnau tou, which is honeycomb tripe in a dark marinade with ginger and some other spices.  It is delicious, and I wish I could get a recipe for it.  The third stomach is the omasum, which is also called leaf tripe or book tripe.  It is hard to tell from the photo, but those aren't just folds in the stomach, they are actual partitions that stick into the space.  This is the type of tripe that is used for gnau ba yip, another common dish in Chinese restaurants.  It is usually only very mildly spiced, and is pure white.  The fourth stomach is the abomasum, which is the true stomach.  I have never seen this for sale.  It has a very different texture, because it is lined with glandular tissue (it is the only stomach that secretes digestive juices).  Apparently it is called reed tripe, and isn't very highly regarded.
  
Honeycomb (left 2), leaf  (center) and reed (right) tripe. S Crawford photo.
Obviously it is important to wash the tripe very thoroughly.  It actually washes easier than you might expect, and you can see that my tripe is all quite clean, no specks of green stuff.  However, you also have to remove the lining.  Tripe that you buy in the store is bright white.  The brown lining has been removed to reveal the off-white colored tissue underneath, and that is chemically bleached to make it pure white.  I don't really care about bleaching it, but it does seem like I should remove the lining.  Unfortunately, there is very little information available on how to do this yourself.  A few people suggested boiling it for a long time, which I did.

Boiled trip. S Crawford photo.
This is the boiled tripe.  As you can see, it shrank.  However, the lining has not fallen off.  After hours of tedious picking, I succeeded in pealing half of the omasum (front right).  The reticulum has resisted all attempts at pealing.  Obviously there is some trick that I'm missing.  I'm currently trying an acid bath.  Any suggestions would be welcome.

_________________________
Stu Crawford is a Canadian ethnoecologist, lichenologist, and forager who lives on Haida Gwaii.
Pin It submit to reddit